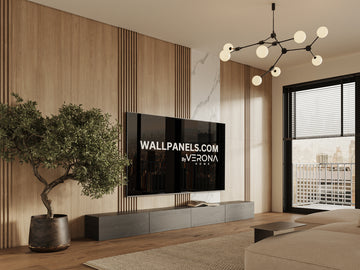


Las Olas Marble & Wood 3-in-1 Designer Panel Set
-
 100% Satisfaction Guarantee & 100-Day Free Return
 -
Order Today for the Fastest Delivery:Oct 22 - Oct 26
-
Free US Shipping for All Panels
Enjoy free shipping on all orders over $75 across the continental U.S. Orders are shipped within 1 business day, with delivery times ranging from 1 to 10 business days. For urgent orders, please contact us at info@wallpanels.com to arrange details.
Additionally, enjoy a 100-day return policy, ensuring you can shop with confidence and find the perfect fit for your space.
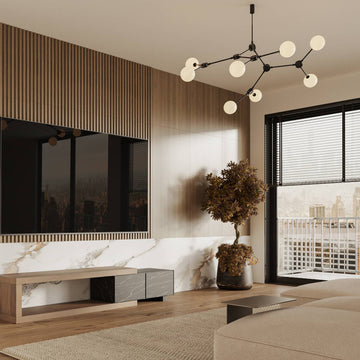
Las Olas Marble & Wood 3-in-1 Designer Panel Set

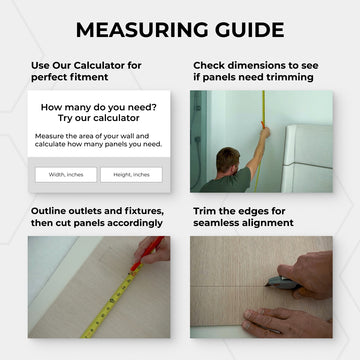
How to Measure
- Measure the height and width of the wall using a measuring tape.
- If covering an entire wall, measure from floor to ceiling and from one end to the other.
- Divide the total wall area by the coverage of one panel to determine the quantity needed.
- Add 10% extra for cuts and adjustments.
- Use a level and pencil to mark straight horizontal and vertical guidelines on the wall.
How to Install Wall Panels
Step 1: Prepare the Surface
- Clean the wall to remove dust, old coatings, or irregularities.
- If the wall is uneven, level it with plaster or drywall.
- In humid areas, treat the wall with an antiseptic solution.
Step 2: Choose Installation Method
- Stick-to-the-Wall Method – Ideal for flat walls without LED lighting, securely installed using liquid nails for long-lasting adhesion.
- Frame Method – Ideal for uneven walls or LED integration.
- Frameless with Dividers – Allows for spacing between panels.
Step 3: Installation
For Frameless (Glue) Method:
- Apply construction adhesive to the back of the panel in a snake or dot pattern.
- Press the panel firmly against the wall and level it.
- Align additional panels tightly and repeat the process.
For Frame Method:
- Attach plywood slats to the wall using dowels and screws.
- Apply adhesive to the back of the panel and affix it to the slats.
- If adding LED lighting, attach the LED strip before securing the panel.
For Frameless with Dividers:
- Apply adhesive to the back of the panel.
- Press it against the wall and ensure it is level.
- Use 3/16-inch spacers between panels if necessary.
- Secure with brad nails if extra support is needed.
Step 4: Finishing Touches
- Install moldings or skirting boards if needed.
- Wipe down the surface to remove dust.
- Inspect the installation to ensure all panels are secure.
Designed for Your Comfort
Our Customers Love Our Designs
Let customers speak for us

I used thermo-treated pine panels for my outdoor patio. They’ve proven to be durable and weather-resistant.
I installed thermo-treated pine in my living room, and they add a warm, natural aesthetic.
The panels were easy to install and are holding up well in our humid climate.
Thermo-treated pine has a timeless elegance that fits perfectly in my dining area.
These panels make my exterior walls look stylish and contemporary.
I appreciate the eco-friendliness of these panels, knowing they’re VOC-free.
We used these panels for our bedroom walls, and they add a calming, natural vibe.
The pine panels are very versatile and worked well for my terrace and interior spaces.
I was impressed by how the thermo-treatment enhanced the durability of the pine wood.
After installing these panels on our balcony, I noticed how resistant they are to UV exposure.
The panels were shipped quickly and arrived in perfect condition.
We used pine panels for our bathroom walls, and they handle the moisture without any issues.
I highly recommend these panels for anyone looking for a durable and stylish option.
These panels brought a luxurious feel to our office.

Great value for durable and beautiful cladding!
Recently Viewed Products
FAQ
How do I install your wall panels?
Our panels are designed for easy DIY installation or can be installed by a professional. Installation methods may vary, but generally, they can be attached using:
- Liquid nails or construction adhesive
- Screws or finishing nails
- Mounting frames (2x4, MDF, or plywood backing for added stability)
- For additional details check our installation manuals.
Can panels be painted or stained?
Some of our panels, particularly Thermowood and unfinished wood panels, can be stained or re-oiled to maintain color vibrancy. Panels with laminate or marble textures should not be altered.
9. How do I clean and maintain the panels?
- For wood panels, use a soft cloth or microfiber duster. Avoid harsh chemicals.
- For marble-textured panels, wipe with a mild soap solution and soft cloth.
- For outdoor Thermowood panels, periodic re-oiling with UV-protective oil is recommended to maintain color.
What is your return policy?
We offer a 100-day return policy, allowing you to shop with confidence. If your panels don’t meet your expectations, you can return them hassle-free.
Can I request custom sizing or colors?
At this time, we do not offer custom sizing. However, our panels can be cut to fit your space during installation. Some wood panels may be stained or oiled for a customized finish. Contact us info@wallpanels.com for further information.